Tiny Crochet Whale Keychain Pattern Perfect for Collectors
Splash joy into your accessories with this Crochet Whale Keychain Pattern, perfect for cute gifts, playful décor, and handmade charm.
Sweet Crochet Whale Keychain Pattern for Pocket-Sized Fun

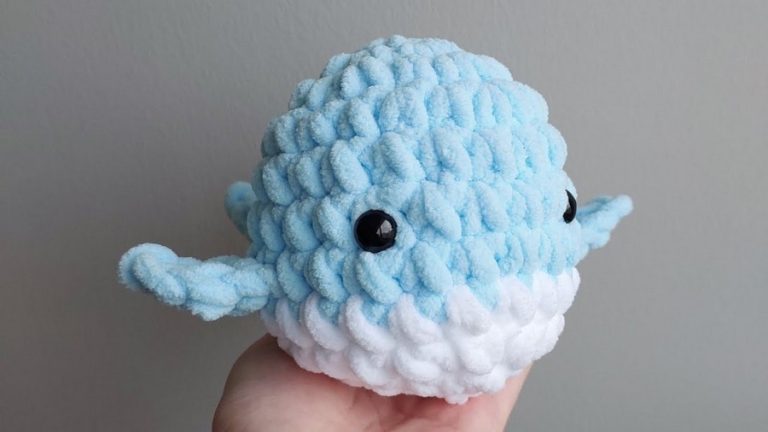
A small companion can carry the calm and majesty of the ocean wherever it goes. This crochet whale keychain brings the gentle presence of the sea into everyday life, transforming a simple set of keys into a cheerful accessory. Its rounded body, tiny fins, and friendly expression make it instantly endearing, while its compact size ensures it travels easily, adding charm to bags, backpacks, or keyrings. Ideal for animal lovers or as a thoughtful gift, it serves both practical and decorative purposes, brightening daily routines with a touch of whimsy.
Materials
You’ll need:
- Blue Yarn: For the whale’s body (DK weight is recommended).
- Cream/White Yarn: For the whale’s belly.
- Pink Yarn: For blush details (optional).
- Black Yarn: For embroidered eyes (you can also use plastic safety eyes for a no-sew option).
- Crochet Hook: Size recommended for your yarn (e.g., a smaller hook like 3.5mm for tight stitches).
- Toy Stuffing: To fill the whale’s body.
- Scissors: For trimming yarn ends.
- Yarn Needle: Used to sew details (eyes, blush).

What makes this whale stand out is the careful attention to shape and proportion. Its smooth, three-dimensional form captures the soft, flowing lines of a whale, while light stuffing maintains structure without adding bulk. A sturdy keyring attachment makes it functional for everyday use, and its playful details—like a gentle smile and tiny fins—give it personality and appeal.
The project offers a satisfying sense of accomplishment, providing a moment of focus and creativity for makers of all levels. Beyond its visual charm, this whale keychain serves as a small symbol of care, joy, and connection to nature.

Step-by-Step Details
Step 2: Begin with a Magic Ring
- Create a magic ring: This is the foundation of your whale.
- Loop the yarn around two fingers to create two loops.
- Insert your hook into the first loop and pull the second loop through.
- Carefully hold the structure in place and chain two (to secure the magic ring).
- Note: Making a magic ring can take practice—don’t worry if it takes multiple tries, as this is the hardest part of the project.

- In the magic ring, crochet 6 single crochets.
- Tighten the ring by pulling the yarn tail. Once secure, place a stitch marker after the last stitch to help track rounds.
3: Build Up the Whale’s Body
Round 2:
- Increase in every stitch: Make two single crochets in each of the 6 stitches from Round 1 for a total of 12 stitches.
3:
- Alternate between one single crochet in one stitch and two single crochets in the next. Repeat this pattern until the end of the round. You should now have 18 stitches.
4:
- Alternate between two single crochets in one stitch (increase) and single crochets in the next two stitches. Repeat the pattern for a total of 24 stitches.
4: Crochet Even Rounds (5–8)
- In Rounds 5–8, work one single crochet into each stitch without increasing.
- At this point, your whale’s body will begin to curve and take shape. Push in the edges as needed to maintain the circular shape. Continue using a stitch marker to track your rounds.
5: Create the Tail
After finishing Round 8, it’s time to crochet the tail:
- In the first stitch of Round 9, work a slip stitch into the front loop only.
- Chain 6, then crochet along the chain to shape the first half of the tail:
- Double crochet in the third chain from the hook.
- Double crochet in the next chain.
- Half double crochet in the next chain.
- Single crochet in the last chain.
- Slip stitch back into the stitch where you started the tail.
- Repeat the above steps (chain and double crochet sequence) to create the other side of the tail.

6: Add Fins
- In the next 5 stitches, work single crochets to secure space for the fins.
- To create the first fin:
- Work a slip stitch into the front loop of the next stitch.
- Chain 4 and crochet along the chain:
- Double crochet into the third chain from the hook.
- Half double crochet into the next chain.
- Slip stitch back into the stitch connected to the body.
- Work single crochets into the next 11 stitches, then place the second fin directly opposite the first fin using the same chain and double crochet sequence.
7: Attach the Belly
- Switch to your cream/white yarn to crochet the belly.
- Attach the cream yarn to the back loops left from the tail stitches.
- Work single crochets into these back loops and incorporate decreases (crochet two stitches together) to close the gaps as you crochet in rounds.
- On the next round, work into both loops instead of just the back loops to create decreases and close the belly further.

8: Stuff and Close the Whale
- Remove the stitch marker and stuff the whale with toy filling. Adjust the amount to achieve the desired firmness.
- Continue working decreases around the body until the hole is closed.
- Cut the yarn and use a yarn needle to sew the last stitches smoothly and hide the tails by threading them through the whale’s body.
9: Add Facial Details
- Use black yarn to embroider small eyes onto the whale’s face. Place them along the second row of the body for an even and cute look.
- Add pink yarn as blush or optional cheeks.
- If preferred, plastic safety eyes can be used for a completely no-sew project.

Special Features
- No-Sew for Structural Elements: You don’t need to sew the tail or fins—everything is crocheted directly onto the body, making it beginner-friendly.
- Fast Project: Takes under 20 minutes to complete, making it perfect for quick last-minute gifts or decorations.
- Customizable Design: Adjust the colors, yarn weight, or hook size to create whales of different sizes or styles. Plastic safety eyes enhance the no-sew aspect.
Level of Difficulty
This is a beginner-level pattern, great for learning basic crochet techniques like magic rings, working in rounds, and decreases. The only moderately challenging parts are crocheting the magic ring and tightening the belly during decreases, but they are achievable with practice and patience.
Tutor’s Suggestions
- Practice the Magic Ring: If you’re new to crochet, spend time mastering the magic ring before moving forward. It may take a few tries, but it’s an essential skill for this project.
- Use a Stitch Marker: Maddy emphasizes the importance of tracking rounds with a stitch marker, especially as the rounds are worked continuously.
- Customize Details: Use plastic safety eyes for simplicity or experiment with blush and embroidery for added personality.
Uses
- DIY Gifts: Perfect as handmade presents for family and friends.
- Decor: Cute accent pieces for shelves, desks, or nurseries.
- Keychains or Bag Charms: Small and compact enough to be turned into accessories.
Pro Tip
When working decreases, pulling gently on the yarn while crocheting will help tighten up the stitches and create a nice, seamless finish. Take your time—your stitches will look neater with care.
Conclusion
The tiny crochet whale pattern is a fun and quick project, perfect for beginners or anyone looking for a fast, no-sew pattern. The whale’s adorable design is universally appealing, and its versatility makes it ideal for gifts or décor. With simple stitches and easy-to-follow steps, this cute crochet whale is achievable and rewarding for all skill levels.