Cozy up your holiday décor with this Crochet Nativity Donkey Pattern, featuring festive charm, delightful details, and seasonal warmth.
Beautiful Crochet Nativity Donkey Pattern for Thoughtful Gifts

A humble creature has long carried stories of loyalty and patience through countless generations, quietly standing alongside celebrations and traditions. This crochet nativity donkey brings that gentle presence to life, offering a soft and charming companion that complements any seasonal display. Its rounded body, expressive face, and attentive posture make it a delightful accent for nativity scenes, holiday décor, or as a thoughtful gift for those who cherish meaningful keepsakes.
Materials:
- Same yarn used in previous nativity scene characters (gray, beige, etc.)
- Crochet hook
- Tapestry needle
- Scissors
- Safety eyes
- Fiberfill stuffing
- Pins or markers (to mark rounds)

The donkey stands out through its careful shaping and delicate details. Its sturdy yet soft body, perky ears, and small hooves create a lifelike yet whimsical figure that holds its form beautifully.
Subtle nuances, like the tilt of the head and gentle curves of the limbs, lend personality and depth, while the overall construction allows for a balanced and huggable companion. The project is approachable for beginners while offering a rewarding sense of precision for experienced makers who enjoy adding detail.
Step-by-Step Instructions
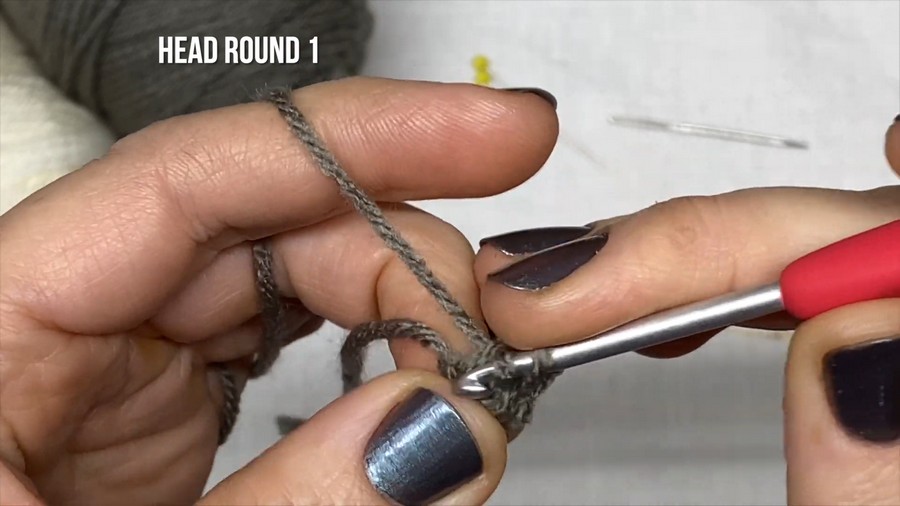
1. Head
- Start with a magic knot and chain 2, then make 6 single crochets into the first chain.
- Round 2: Increase every stitch (2 single crochets per stitch).
- Round 3: Alternate 2 single crochets and 1 increase across the round, finishing with 16 stitches.
- Rounds 4–6: Single crochet each stitch (no increases).
- Round 7: Begin decreasing (2 single crochets followed by a decrease); finish with 12 stitches.
- Round 8: Decrease sequence: Single crochet once, then decrease (results in 8 stitches).
- Add fiberfill and safety eyes between rounds 8 & 9, ensuring they are positioned correctly on either side of the head.
- Round 9: Increase every stitch to create 16 stitches.
- Round 10: Introduce “muzzle color” (beige) at the first stitch and continue single crochet, securing color changes.
- Continue additional rounds with single crochet and decreasing sequences until the head is complete.

2. Body
- Start by chaining 2, make 5 single crochets into the first chain.
- Round 2: Increase every stitch (10 stitches).
- Round 3: Alternate single crochet and increase (15 stitches).
- Round 4: Create neck opening by chaining 5 and skipping corresponding stitches in the base.
- Round 5: Incorporate single crochets into all stitches, including chain space (15 stitches).
- Rounds 6–8: Single crochet every stitch.
- Round 9: Begin decreasing with a sequence of 3 single crochets followed by a decrease (12 stitches).
- Round 10: Decrease every stitch (6 stitches) and fasten off.
- End by stuffing the body firmly with fiberfill.

3. Legs
- Each leg starts with a chain of 2. Work 5 single crochets into the first chain.
- Rounds 2–3: Increase and single crochet consistently to form the hoof (color changes from beige to gray).
- Rounds 4–8: Continue decreasing until the leg is tapered. Stuff the hoof firmly and lightly stuff the leg—repeat for all four legs.

4. Ears
- Chain 8. Using slip stitch, single crochet, and half-double crochet, form the unique ear shape in the second chain. Once complete, cut the yarn, leaving a tail to attach to the head later. Make two ears in gray.
5. Tail
- Chain 10 then slip stitch back into each chain. To add fluff, tie two 3-inch pieces of yarn to the tail-end, creating a knotted tuft.

6. Assembly
- Attach each piece one by one using the long tails left for sewing. Arrange the head, legs, and tail carefully, ensuring symmetry for balance. Attach the ears, leaving them slightly floppy for added charm.
- (Optional) Add a mane by tying multiple strands of cut yarn to the donkey’s back. Once attached, trim them to the desired length. This adds extra character to the donkey’s appearance.

Special Features
- The donkey is made from multiple easy-to-follow parts, making it more customizable.
- Its realistic features—like safety eyes, floppy ears, a fluffy tail, and optional mane—give it charm and uniqueness, adding great personality to the nativity scene.
- As a 3D figure, it stands sturdily if properly balanced during assembly.
Level of Difficulty
Angela categorizes this as an intermediate project due to the multiple parts to crochet and assemble. Beginners can try their hand, but patience and persistence will be needed, especially during fiddly tasks such as attaching legs and ears or working with fiberfill stuffing.
Tutor’s Suggestions
- Pay extra attention to alignment when assembling the donkey—ensure the eyes, legs, and head are proportionate and balanced.
- Avoid over-stuffing the legs to maintain sturdiness.
- Angela emphasizes patience when completing the trickier parts, like the neck and attaching the mane.
Uses
This donkey is a key addition to the nativity scene. Beyond festive décor, it can also be used as a standalone gift or keepsake, perfect for holiday celebrations.
Conclusion
In this delightful project, Angela guides you through crafting a truly lifelike donkey that brings whimsical charm to your nativity scene. Though detailed, this beautifully crafted figure serves as a testament to persistence and creative joy—piece by piece, you’ll create a special addition that radiates holiday spirit.
Tip
When assembling the donkey, try pinning its parts into position before sewing to check alignment and balance. This simple step avoids frustration and ensures a polished final result!