Connect some fun with this free crochet Highland cow pattern that’s for whipping up a fluffy, horned buddy everyone will love.

Cute Crochet Highland Cow Crochet Pattern Is Too Cute to Miss
With its charming horns, fluffy texture, and adorable design, this crochet project brings a Highland cow to life in the most delightful way. Whether it’s a thoughtful handmade gift, a whimsical decor piece, or a cuddly companion, this pattern offers both beauty and versatility. It not only allows you to create a detailed plush character but also helps you improve your crochet skills with its balanced mix of simplicity and artistic detail.
Please Visit this video for whole pattern

This pattern features basic yet essential crochet techniques, like single crochets, magic circles, increases, and decreases, making it a fantastic choice for intermediate crocheters or ambitious beginners.

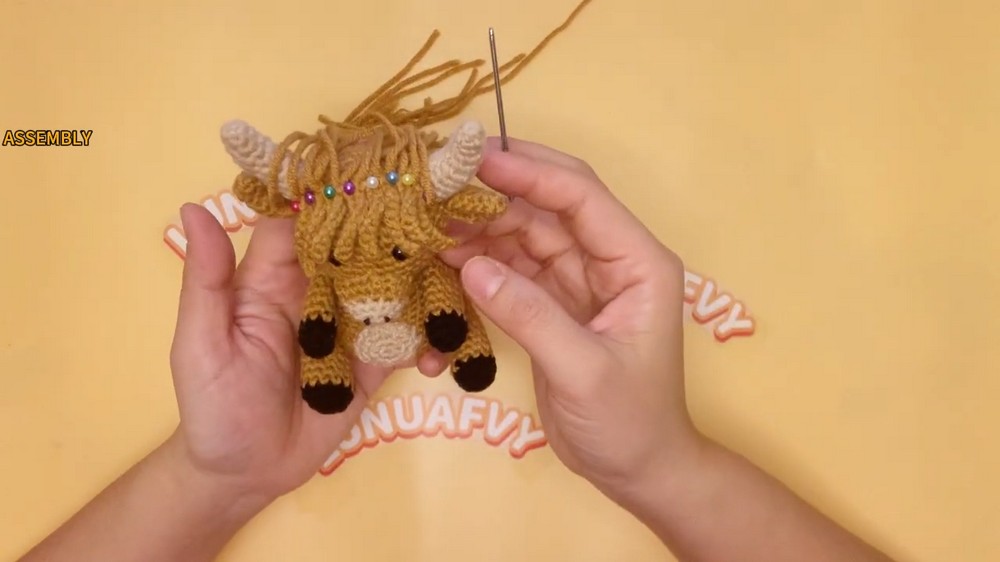
You’ll learn to craft individual parts like the head, body, floppy ears, horns, and tail, and then carefully assemble them into a complete Highland cow.

The plush texture and smooth stitching create a professional-looking finish, while the opportunity to customize colors and fluff add a personal touch.

This project’s benefits go beyond just crocheting, working on detailed patterns like this offers relaxation and builds patience while stimulating creativity. The tutorial ensures even complex steps, such as assembling the pieces or adding small details, are manageable. By the end, you’ll proudly hold an adorable Highland cow that’s truly one of a kind.
Materials Needed
- Yarn: Two colors (Color #1 as primary/dominant color and Color #2 as the secondary/accent color)
- Crochet Hook: Size appropriate for the yarn you are using.
- Other Supplies:
- Stitch markers
- Stuffing cotton (fiberfill) for filling the doll
- Scissors
- Yarn needle for assembling parts
- Safety eyes (for adding features)
Special Features of the Pattern
- Magic Circle Foundation: The pattern begins with a magic circle, providing a neat, closed center for your crocheted parts.
- Spiral Crochet Method: Parts are crocheted in a continuous spiral to avoid visible seams.
- Color Changes: This project involves seamless color changes to add dimension to the doll’s design.
- Fine detailing: Intricate shaping is achieved through increases, decreases, and careful adjustments to tighten stitches.
- Multi-Part Assembly: The pattern includes several small parts assembled at the end to create the final design.
Level of Difficulty
The tutorial caters primarily to intermediate crocheters, but beginners with a basic understanding of:
- Single crochet stitches,
- Magic circles,
- Increasing,
- Decreasing, and
- Reading simple patterns
can also follow along after practicing key techniques.
Tutor’s Suggestions
- Master the basic crochet stitches and techniques—single crochet, magic circle, and increasing/decreasing—before beginning the project.
- Practice counting stitches carefully to avoid errors in stitch placement and totals.
- Tighten stitches regularly to maintain a clean appearance and consistent structure.
- Use stitch markers at the beginning of each round to keep track of your progress.
- Incorporate stuffing as you go (especially for small parts like the head and body) for even filling.
- Double-check color changes to ensure smooth transitions without loose threads.
Uses of the Crochet Doll
- A thoughtful handmade gift for loved ones.
- A charming decoration or collectible item.
- A stress-relieving creative project.
- A skill-building exercise for crocheters progressing to advanced techniques.
Conclusion
The video tutorial offers a comprehensive guide to crocheting a beautiful and detailed doll. By carefully following the instructions, you can achieve clean finishes, smooth transitions, and a cohesive final assembly. This project teaches essential skills like crafting shapes, color changes, and even assembling small parts—all while offering a fun and engaging experience for creators.
Tip
When switching colors, always hold the loose end of the yarn taut and crochet over it for a neater finish without visible breaks or knots.