Bring a touch of cuteness to your keys with this Crochet Otter Keychain Pattern that adds charm, personality, and handmade flair.
Beautiful Crochet Otter Keychain Pattern for Everyday Charm

From a few strands of yarn emerges a tiny otter that seems to carry the charm of rivers and playfulness in its form. This crochet otter keychain captures that gentle spirit perfectly, turning an everyday accessory into something truly delightful. With its soft texture, rounded body, and endearing face, it adds a personal touch to bags, keys, or backpacks while bringing a hint of warmth and whimsy wherever it goes.
Materials and Uses
- Yarn: You use a light brown or tan yarn. The tutor recommends a thin yarn (size 1 or 2 thickness) for a small result.
- Hook Size: You select a hook size appropriate for your chosen yarn.
- Tools & Embellishments:
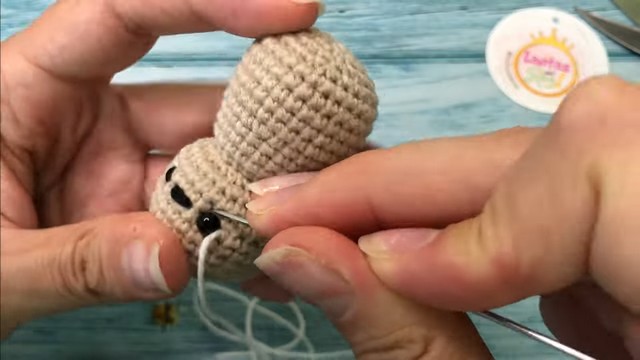
- Safety Eyes (5mm recommended, adjust size based on yarn thickness).
- Stuffing (relleno) and a tapestry needle for assembly.
- Snaps/Clasps (Broches): The tutor uses small metal clasps (like those from a bra) to allow the otters’ hands to hold.
- Optional: Thin wire (0.5 mm) for whiskers (bigotes).
- Keychain ring (if making a keychain).
- Uses: You create a lovely, personalized keychain, a sentimental gift for a couple (especially for Valentine’s Day), or a small collectible Amigurumi.
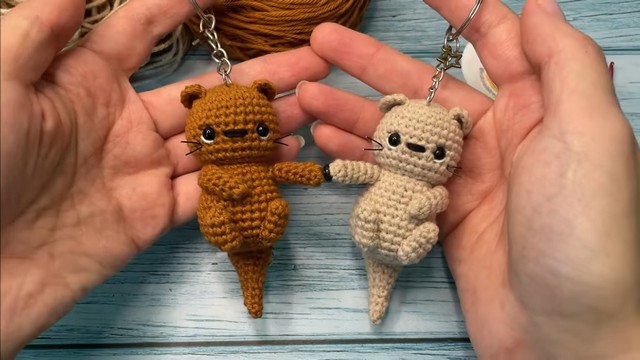

The charm of this otter lies in the balance between simplicity and thoughtful detail. Its smooth texture and soft form are shaped with gentle yarn, a basic crochet hook, and approachable stitches like single crochet and light increases.

Each part—from the rounded body to the curved tail—flows naturally, giving it a lifelike yet playful appearance.

Expressive eyes and tiny paws enhance its personality, while light stuffing keeps the shape neat and firm.

A sturdy keyring connects easily to bags or keys, making it both decorative and functional. The process is soothing and rewarding, and the finished piece becomes more than an accessory, it’s a small symbol of joy.
Follow the full tutorial to bring this adorable otter to life, stitch by stitch.
Level of Difficulty & Tutor’s Suggestions
This project requires proficiency in Amigurumi basics and intermediate skills in:
- Crocheting small parts (arms and legs).
- Working complex assembly, including attaching the body directly to the front loops of the head.
- Detailed sewing for the ears, tail, and facial features.
Tutor’s Suggestions (Active Voice)
- You place the safety eyes between Rounds 9 and 10 of the head, leaving five stitches between them.
- When you finish the head’s last decrease round, you work the decreases into the Back Loops Only (BLO). This leaves the Front Loops Only (FLO) free, which you use to attach the body directly.
- You begin the body attachment from the back of the head to hide the starting point.
- To create the characteristic otter tail shape, you stuff the tail lightly, flatten the large opening, and then sew it shut before attaching it to the body.
- When you sew the ears, you fix both outer points on the same row, then anchor a point one row lower in the middle to make the ear fold down naturally.
Special Features
- Seamless Head-to-Body Construction: You join the body directly to the free front loops of the final decrease round of the head, which creates a smooth transition without a visible neck seam.
- Optional Interactive Hands: You sew small metal snaps (broches) onto the tiny arms, allowing two otters to physically clasp hands and form a unified couple piece.
- Flattened Tail: You use a specific technique to create a long, slightly flattened tail (cola). You start with a chain, work in a spiral, and flatten and close the base for a realistic final shape.
Step by Step Guide
In this detailed tutorial, you learn to crochet a tiny, adorable Otter Amigurumi, specifically designed to be made as a matching pair or keychain for a loved one. You create a small, quick-to-make project that features a seamless head-to-body connection and the option to add a special coupling mechanism so two otters can hold hands.
Conclusion
You successfully complete the charming Otter Amigurumi, featuring the unique seamless body attachment and the optional, interactive clasps on the hands. By diligently following the shaping steps for the body and the distinctive flattened tail, you create a sturdy, gift-ready piece perfect for use as a keychain or part of a matched couple.
Final Tip
To ensure the Otter’s hands can clasp securely, you attach the small metal snaps/clasps (broches) firmly to the center of the hand. You must sew the clasps multiple times around the entire metal edge, making them as taut as possible against the tiny arm fabric to prevent them from tearing off with repeated use.